Wednesday, August 19, 2015
Perplexing Puzzles 8/19/15
Today, I have a puzzle page for older kids with a Punundrum and Phrase Finder.
There are also 2 new number coloring pages for your younger students. You can find more of these pages here and here.
Click on the pictures to download the puzzles shown and have fun!
Saturday, August 15, 2015
String Art Templates
A couple weeks ago, I posted about creating string art with my kids. While we were making these masterpieces, I kept thinking that it might be an easier project to accomplish if you had some templates! Especially if you are working with younger kids. So I whipped up a couple and gave it a try...
Download templates here.
The first version I attempted used a hole punch. This works well, but creates some rather big holes in your design.
But if you're working with younger children, this should make it easier to thread a plastic needle through the holes. Here are some instructions, if you'd like to give this a try:
Supplies:
Craft Foam Sheets - 8 1/2" X 5 1/2" or larger
Hole Punch (or paper punch/poker thingy)
Scissors
Plastic sewing needles
Variety of yarns
1) Print out the template. The first one in the file (template #1) makes the design above and is the easiest to sew.
2) Cut your foam sheet to 5 1/2" X 5 1/2" and cut closely around the template. Tape the template on top of the foam at the edges.
3) Use your hole punch to punch out all the black dots. It's a little bit harder to punch through foam than paper, but it works fine.
4) I wanted to leave the number guides on the foam for ease of sewing, so I cut around the inside of the holes and removed the inner section of paper. If you have the template taped securely along the edges of the foam, the numbers should stay in place.
Now I am ready to sew!
5) I started with about 8ft of yarn. Thread that onto your needle.
6) Tape one end of the yarn to the back of the project.
7) Bring your string up through hole number one and then down in hole number two. Come back up through hole number three and continue.
8) For this template, I decided to change colors after hole number 18, so I cut the string and taped the end to the back.
9) Thread a new color onto your needle and begin again at hole number 19. (You'll notice that this is also hole number 1). Proceed to hole number 20 and finish at number 36.
10) When you're done, remove the paper template and your masterpiece is ready!
For the second version of this project, I used a paper poker tool to create the holes for the needle. (I really can't remember what these are called, but above is a picture of one.) I'm pretty sure you can get these at a scrapbook supply store. Maybe they even make hole punchers with smaller holes! Anyhow, the point (pun intended) of using this tool is to get smaller holes.
For this project, I used template #2. You can see the tiny holes created by the tool above. The big plastic needles slide through these small holes just fine.
This is what template #2 looks like when finished. To get this effect, use two colors. With the first colors sew from holes 1 to 36. Then switch to a different color and sew from holes 37 to 72.
If you want to use 4 colors (one for each corner), then switch colors like this:
Color 1 - sew from 1 to 18
Color 2 - sew from 19 to 36
Color 3 - sew from 37 to 54
Color 4 - sew from 55 to 72
To create this project, use template #3. With one color, sew from 1 to 56.
You can vary this design by adding another layer of color. Simply start at hole 1 and then decide how many holes you want to skip before you sew. For the yellow, I brought my thread up through a hole, skipped four holes, and brought my thread down through the fifth. You can vary how big your final circle will be by changing how many holes you skip!
Template #4 is more complex. You can use the template to create a rainbow flower.
I used the template to create this spiral instead. To create this, simply sew every other letter. So I sewed from A1 to A18, then C1 to C18, E1 to E18, G1 to G18, I1 to I18, and K1 to K18 all with a single color.
To get the look of the flower, sew from A to K, switching out your colors for every letter.
The easiest template for young kids will be temple #1. They will need to be able to count from 1 to 36 and not get too frustrated when their yarn becomes tangled. Moms are great at helping with untangling! Template #3 is also not too difficult.
I also found this easy tutorial, Spirelli String Art, for creating circular string art. It uses cut paper circles with notches, and the thread is wrapped around the circle. Sounds quite simple. And those are some pretty circles they have made!
Good luck with your string art projects and let me know below if you have any questions!
Sunday, August 9, 2015
Summer Break - Day 10 - Paracord Bracelets
Last night, we stayed up late watching "The Adventurer: The Curse of the Midas Box" and making paracord bracelets.
Jack has made these before, so he was our experienced professional! He required the chunkier paracord for his manly bracelets. Ginny and I liked the thinner cord...mostly because it came in prettier colors!
Here's one of the thin ones partly done. The standard paracord bracelet uses a square knot. This is a pretty easy knot to tie. Jack and Ginny are now masters square knotters! I believe Jack got a paracord bracelet kit for Christmas when he was 10, and he had no problems with the knots at that age either.
We picked up some compasses to add to our bracelets too. Now they are truly survival bracelets! Paracord bracelets are made so that you can unravel them in an emergency and use the cord for rappelling down a mountain, tying down some gear, or making a tourniquet. In our case, we also have a compass to tell which direction we are going! Paracord sold at a craft store is not military grade. So I wouldn't actually use the cords from the bracelets to rappel down mountains! But they should be good for tying down gear. Since our Papa is an Army guy, we do have real paracord lying around the house, but it's not for crafting use. He used to parachute out of planes and paracord is often used to rig parachutes.
Here is our final set of bracelets from last night. We did try one multicolor bracelet. There are a ton of tutorials on youtube for making these, including a bunch of really neat looking variations. I am going to give some of those other knots a try today...we certainly bought enough paracord!
Saturday, August 8, 2015
Summer Break - Day 9 - Tie Dye
Today's summer fun activity was Tie Dye! This was a project we had never tackled before. Luckily, some of our experienced tie dyer friends joined us!
We set up our equipment on the surface of the sun...or in the backyard...it's hard to tell the difference around here.
And then we threw some dye around. It was a lot of fun! Our kit said it would make 9 items, but that wasn't nearly enough for the 8 items Ginny and I wanted to dye. Luckily our friends brought a ton of extra dyes!
Here are our projects all bundled up for the 4-8 hour dye setting time. We actually let our sit for 24 hours.
And here is a rainbow bandana that looks pretty sharp after rinsing.
And Ginny's crumple shirt.
But something didn't go quite right in the wash. Maybe our detergent works too well? Everything faded quite a bit. We also didn't use quite enough dye to really saturate our bigger items, so we found when we unwrapped them, that there were still quite a lot of white areas left. I wanted some white to show, but not that much!
So if we do it again, we now know that we should buy more dye than we think we'll need. And apparently there are a lot of reasons the dyes might fade on washing, including crummy fabric (quite possible in our case!) or hard water. I also saw a recommendation to leave the dyed pieces in the sun. Heat will help the dyes bind with the fabric. We brought our dyed pieces inside because we thought it was too hot outside for them! Ah well. Lessons learned.
But we had a good time anyway!
Tuesday, August 4, 2015
Summer Break - Day 8 - Foam Stamps
Today we made some stamped greeting cards using foam stickers. You can find barrels of these foam stickers at your local craft shop. If you have little kids around your house, you probably already have some! It seems like we always had a huge supply of these when the kids were younger.
So first, we cut some cardboard up into appropriate sizes for our greeting cards. Then we applied the foam stickers in different patterns. Be warned...using the letter stickers can get hairy! You have to write your words backwards! Many of the letters will look fine forwards and backwards, but some of them must be glued down up-side-down to come out correctly when stamped. You should probably avoid letters if you are doing this with younger kids.
Once your design is done, brush it with paint. and then stamp in place! We used acrylic paint which is water based and washes up well. We also found that the sponge rollers worked the best for applying the paint to the stamps.
We applied some of our stamps directly onto the card fronts, and some of them to smaller pieces of paper.
We layered the smaller printed pieces with colorful card stock and pasted them to the fronts of the cards.
And for some of them, we pasted a special message inside.
And now we have a ton of fancy new greeting cards to send to our family and friends!
Summer Break - Day 7.5 - Flexagons
Working with origami paper reminded me of a project we did last summer...flexagons!
Watch this *awesome* video from Vi Hart to learn more about hexaflexagons. Vi Hart truly makes math fun!
You can find templates for these little guys at a bunch of different websites. Here are a few:
- Gathering for Gardner - has colorful ones and blank templates
- Aunt Annies Crafts - template for a tri-hexaflexagon
- Aunt Annies Crafts - template for a hexa-hexaflexagon
- Mathematische Basteleien - Tons of info and shows tetra-hexaflexagons
This is a picture of us from last year learning how to flex our flexagons while we ate pizza! I challenge you to flex and eat (or some other task) at the same time!
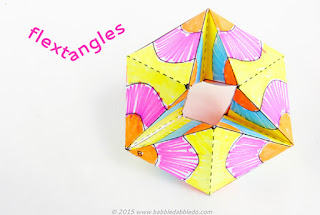
This year, I came across a neat tutorial for making Flextangles at Babble Dabble Do!
And, of course, I had to give that a try! Here is my flextangle flexing through its iterations. They are a bit easier to put together than a normal flexagon, and they're fun to flex about, but real flexagons have hidden secrets that make them even more exciting to play with! So give some of these shapes a flex yourself and see what you think!
Subscribe to:
Posts (Atom)