Pages

Thursday, July 30, 2015

Summer Break - Day 4 - Line Art


Today's project involved lots of lines!  The idea is to draw a bunch of straight lines and have them appear to be forming curves.


There's a great tutorial at What Do We Do All Day.  And another at Wonder How To, which includes 3d and string art examples.


Jack completed one simple picture, but at least he smiled for the photo!


Ginny also complete one, and she added some color!


I made this one and added a construction paper frame.  It didn't actually work out the way I wanted it to.  I didn't have a matching number of tick marks across the top of each section as along the edges.  So I just have 2 lines coming from some of the tick marks.  It turned out just fine!

Geometry: The Beauty of Numbers


 If you'd like more line art for your kids, check out Geometry: The Beauty of Numbers published by Muggins Math.

Pollywogs to Polygons


And Pollywogs to Polygons.  We used these when Jack and Ginny were younger, and they created some beautiful math art while at the same time practicing their basic math facts.  We also own the Muggins! math board game which is another excellent way to practice math facts and have some fun.


For game play today....My birthday is coming up and this is what the kids got for me!


Dixit is quite a lot of fun!


And the artwork is lovely!


The kids weren't interested in doing more wood burning yesterday, but we did fit in more game play.


If Kripke and Wil Wheaton like these games, we figured we would too!  We actually own Sushi Go already, but hadn't played Roll for It!  Wil Wheaton convinced us to pick up a copy.  It is quite delightful!

post signature

Wednesday, July 29, 2015

Summer Break - Day 3.5 - Puzzle Cubes

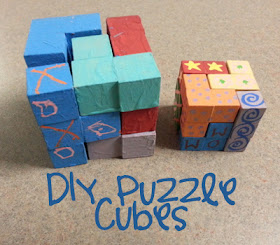
DIY Puzzle Cubes

I found this Puzzle Cube project pinned on pinterest this morning.  It reminded me of a project that I'd done with the kids a couple years ago.  After some searching, I found these pictures!


They are from June of 2010.  We made some puzzle cubes just like the ones described on the blog mentioned above.


I don't quite remember, but I think I must have glued the shapes together for the kids.  They were a bit younger back then!  And it looks like I made them in the typical shapes of a 7 piece puzzle cube.


Then they painted them different colors.


And drew designs on them.


They must have been outside playing before they came in for this craft.  They are super sweaty and red-faced!  It's almost like the surface of the sun in Fayetteville NC in June.


Here's Ginny with some of the completed puzzle cubes stacked up together.

This was an easy craft project to do with the kids.  Jack and Ginny were 9 and 7 back then.

If you're interested in making your own puzzle cubes, check out the blog at the top for more detailed instructions.  You can also take a peak at Thinkfun's Block by Block.  They show the 7 shapes and some of the puzzle cards included with their puzzles.  I totally recommend Block by Block for puzzly and logic fun!


UPDATE - I found the cube puzzles that Ginny and I had made those many moons ago.  You can see the shapes of the different pieces in this picture.  And it looks like I did have the kids glue their own shapes together after all!  Some of Ginny's are a bit off-kilter!

post signature

Tuesday, July 28, 2015

Summer Break - Day 3 - Wood Burning


Today we learned how to burn wood!  For decorative purposes only.


We are planning to do 2 days of wood burning.  Today was practice day.  Ginny burned her name into a piece of wood.


She was hesitant at first.  That tool gets scarily hot!  But she did a great job with her project!  We saw a tip online that you can use watercolor pencils to color in your wood projects.  Just spritz the wood with water first and then color in.  Ginny and I both colored in our pieces.


Jack decided to do the Heroes of the Storm symbol.  (It's some game he plays.)  He did 3 symbols in a row.  He wasn't interested in coloring his in, but thought he might do an edging later.


And these are our final projects!  I did the city scape at the top and the Totoro at the bottom.  (Who can resist Totoro!??!)  Jack's is the second one down, and I guess you can figure out which one is Ginny's.  I thought it would be fun to try some shading on the Totoro.  Ginny says it looks like he's floating on a pond!  Ah well.  It was the first time for all of us.  By the way, we downloaded all these pictures and then traced them onto the wood.  We are not sketch artists!

Final results from today's project...we're not sure we'll do another day of wood burning.  Ginny thought it was super creepy at first, but she really likes her finished project.  She may be interested in doing more tomorrow, but it's hard to say.  Jack didn't seem impressed at all, but at least he tried it!  (Wish I could get him to try more veggies!)

If you're interested in giving wood burning a try, we found videos on youtube by KaWaiiCharMZ831 to be very helpful.  (And she does anime pictures which we love!)


Have fun!


post signature

Monday, July 27, 2015

Summer Break - Day 2 - Robot Building


Today, we built robots! 


Both the bots were built from kits.  The first one was called the Rookie Solar Racer.  It was a nice easy build which Jack accomplished pretty much on his own.


We used a wrench to tighten a nut, but no other tools were required.


Sadly, this little guy just wasn't very powerful.  He definitely needed sun power (flashlight didn't work), but it didn't seem to drive his motor well enough to spin the wheels against any surface.  We tried pavement at first, but that was too rough.  Then we tried this glass table top, but that was a no-go too.  We will tweak him a bit and see if we can get him to work better.  We don't like sad robots at our house.  (Watch out Marvin!)


Our second robot build was called Herbie the Mousebot.  We bought him from the Maker Shed a few months back.  This kit was WAY more complicated.  It involved heavy use of a soldering iron.


Jack and Ginny weren't very comfortable with trying out this new skill, but they both gave it a whirl.  There were a couple of spots that were easy enough for them to solder.  They helped bend resistors and hold pieces together and other such tasks, but I did most of the soldering.


We took a break half way through and headed out to see the Minions movie.  That was a blast!  When we got home, everyone else was worn out, so I finished up Herbie on my own.  That's ok.  They spent a couple hours soldering and building today.


Herbie is quite powerful!  He rolls along at top speed.  But he's got a couple quirks.  I think the battery may not be at full power which causes some problems, and his whiskers get out of control when he bumps into things.  But other than that, he seems to work pretty well.  He's got light sensors for eyes, so he tries to steer towards light.  His whiskers and tail have touch sensors which, when activated, make him back up.  Herbie is a pretty cool dude.

That was our day of making!  Tomorrow we're going to learn how to burn wood...and I don't mean campfires!

If you want more ideas for summer projects, check out Maker Camp.  It's a 6 week online summer camp for young makers.  They have some great ideas for building projects, and throw in learning at the same time!

post signature

Summer Break - Day 1.5 - A Sierpinski Tetrahedron

Sierpinski Pyramid on Pinterest

While I was trying to come up with some maker-style projects that we could work on this summer, I found this idea for a Sierpinski Tetrahedron on Pinterest.  (It is a pyramid too, but a special type of pyramid where all four sides are triangles, even equilateral triangles!)

I wish I had a classroom full of kids to help me build this, but, alas, I have only 2 students!  And since I knew they were not going to be interested in folding a bunch of paper pyramids, I decided to make one myself.


And here is my tetrahedron!  Not nearly as impressive as the one above, but still pretty cool.

The video I used to create these Origami Tetrahedrons has been taken down, but you can try this video https://www.youtube.com/watch?v=r4kmo3dsNIY or another of the many available on youtube. This one seems closest to the method I used. 

The tetrahedrons don't like to stay stacked, so I used bits of wire (snipped and flattened paper clips!) that I threaded inside and then glued them all together.  There's a nice set of instructions at yale.edu for folding tetrahedrons out of envelopes.  This looks like a much easier method, but the origami paper is way prettier!

Sierpinski Triangle - paper version

You could also try a paper coloring version of a Sierpinski Triangle (now we're talking 2 dimensions).  I really love this idea, but again, you do need a bunch of students to really make this work.  Nobody wants to color that many triangles on their own!  This activity is from the Fractal Foundation, and they have a printable that you can download for your kids to color.

Which leads me to why Sierpinski triangles (and tetrahedrons) are so fascinating.  They are fractals!  Which basically means that they exhibit a repeating pattern at any scale.  So you could zoom in and zoom in and still see the same triangle structure.  Conversely, you could keep zooming out, and it would still look the same!  So I'm not an expert on fractals, but you could have your students read up on them here.  That's the Fractal Foundation again and they even have a neat animation showing how you can keep zooming into a Sierpinski Triangle.


As I was creating my Sierpinski Pyramid, I began to wonder about the empty space in the center.  What shape was being removed from the pyramid?  In the triangle (2D version), you keep removing triangles, but in the tetrahedron, the removed space is not a tetrahedron.  Turns out it is an octahedron!


Then I got to wondering about volumes.  How does the volume of the octahedron compare to the volumes of the four tetrahedrons?  I did some calculations and found that they are the same.  So basically, you are removing half the volume of the pyramid each time you dig down into it.  That seemed weird.

matematicasVisuales

So I did some more investigation and found another website that confirmed this idea.  At Matematicas Visuales, they have some fantastic graphics to help you visualize what is going on.  And they show mathematically that the volume of the octahedron is equal to four times the volume of one tetrahedron (with same side lengths of course!)  Have I bored you yet?

Reverse Sierpinski Pyrmaids

Bear with me for another minute.  I also got to wondering what a reverse Sierpinski Tetrahedron might look like and found some wonderful examples at FractalNature.com.  These are amazing!

Anyhow, perhaps your kids would like to tackle a project like this over the summer.  I worked with the triangle based pyramid.  But I wonder if you can create a Sierpinski pyramid using a square based pyramid?  What would the shape of the missing space be?  I'm not sure this would really be a fractal shape since the five sides of the pyramid would not be the same size/shape, but it's an interesting line of inquiry.

If you are more interested in the 2D versions, there are many different ways to construct a Sierpinski Triangle.  Check out the Wikipedia article about Sierpinski Triangles for more info about that.


Here's an example of a Sierpinski Carpet that I whipped up in Photoshop.  You can also try to build a 3D version of this fractal.  It's called a Menger Sponge!

I hope you and your students/children are inspired to create some mathy art this summer!

Happy Making!

post signature

Sunday, July 26, 2015

Summer Break - Day 1


This summer I am trying to keep the kids busy with projects.  We have 2 weeks left, and we've planned a build/craft, a movie, a game, and an hour of reading for each day.  (We would plan outdoor activities, but it's just way too hot here in Georgia for us northerners.)  The other hours can be used as they like.  The idea here is to keep them from playing too much computer.  I thought I'd share some of our projects with you, in case you were wondering what to do with your kids this summer too! 

For our first day, Jack built a trebuchet from a kit we found at Hobby Lobby.  It came with good instructions and all the materials to build the trebuchet.  It did require a scissors, some clips to hold parts together as they dried, and a ruler.


He did a great job of putting it together all by himself, and really didn't like when I would look over and ask how it was going.  There was only one mistake made when he put the gear on backwards.  That took some vinegar and an exacto knife to loosen the glue, but we got it apart and fixed.


And here it is in action.  It mostly works!  Jack needs to experiment with it to see what adjustments need to be made, but that is for tomorrow.


Ginny picked this owl mosaics kit to work on.  She's a total owl addict!  We've been doing these mosaic kits since the kids were pretty young.  Jack got a cars kit when he was about 6.  He worked on those pictures with an intensity that astonished me for that age!

These kits come with cardboard patterns of the pictures to be created and a bunch of sticky foam squares.  Ginny's kit also came with jewel stickers.  The foam stickers are fairly easy to work with.  They are rather like a paint by number.


Here are two of her completed owls.  She doesn't always like to have her picture taken!

Tomorrow we will be working with robot kits and seeing Minions in the theater!  Popcorn is not optional.

post signature